Newbie Xiaomi Redmi Pro TWRP download and Xiaomi Redmi Pro root
Helio X20 MTK6797 and Helio X25 MTK6797T Xiaomi Redmi Pro TWRP download and Redmi Pro root
This guide will help you install TWRP and root MTK6797 and MTK6797T Redmi Pro, the first step is to install TWRP custom recovery on the MTK6797 and MTK6797T Redmi Pro. The process contains quite a few steps, but most of them take just a few seconds.
If it looks daunting, don’t worry, take each step one by one and you’ll come through with TWRP and a rooted Helio X20 MT6797 / Helio X25 MT6797T Redmi Pro within just a few minutes.
Prerequisites and notes
- You must have an unlocked bootloader to follow this guide; flashing through fastboot requires an unlocked bootloader. If your Redmi Pro bootloader isn’t unlocked yet, go to the official Xiaomi unlock page to begin the process.
- You need to backup anything you don’t want lost to your PC or a TF SD card; for TWRP to work, you may need to factory reset. You will lose all user data. Backup all important data BEFORE you flash the TWRP.
1. Download and extract the Redmi Pro root pack. It includes:
- Auto installer for adb commands, adb drivers and fastboot commands– These are the tools that will allow your PC to communicate with your mobile.
- Redmi Pro TWRP– The MTK6797 and MTK6797T Redmi Pro custom recovery used for rooting and flashing custom ROMs onto Redmi Pro.
- Redmi Pro root SuperSU.zip– The SuperSU.zip used for rooting MediaTek MT6797 and MT6797T Redmi Pro through TWRP recovery.
2. Install the adb drivers and fastboot commands
- Extract the above download.
- Run “adb-setup.exe”.
- Hit “Y” to all 3 questions.
- The Google adb driver installer will then popup. Go ahead and allow and install.
3. Prepare your Xiaomi Redmi Pro
- Settings >> About phone >> Tap “MIUI Version” seven times.
- Hit the back button. You should then be at the main settings menu.
- Go to “Additional settings” >> “Developer options” >> “USB Debugging”.
- A warning will pop up. Go ahead and allow.
- Plug your phone to PC via USB cable.
- You should then see a pop up request on your Redmi Pro to give your PC USB debugging permissions. Go ahead and allow.
4. Copy the TWRP and open the command window
- Open Windows Explorer and go to “c:/adb”.
- Copy “twrp-redmipro.img” to “c:/adb”.
- IN A BLANK SPACE (not on a filename etc…), hold SHIFT while RIGHT-CLICK
- Select “Open command window here”. You should then see a small black window open.
5. Boot into bootloader and fastboot flash the TWRP
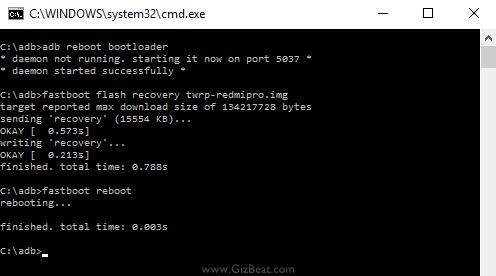
- In the black command window type “adb reboot bootloader”. Hit Enter. Wait about 10 seconds and you should then see your Redmi Pro says “Fastboot” along with the Xiaomi Mascot.
- In the black command window type “fastboot flash recovery twrp-redmipro.img”. Hit Enter.
- You should then see that the file has flashed successfully (OKAY). It all takes just a second. (see pic and video)
6. Boot into TWRP
- In the black command window, type “fastboot reboot”. Do not hit Enter yet.
- Hold Volume Up on the Xiaomi Redmi Pro while hitting Enter on your PC.
- Continue holding Volume Up for about 30 seconds until you see TWRP has booted.
- BAM! You’re now booted into TWRP
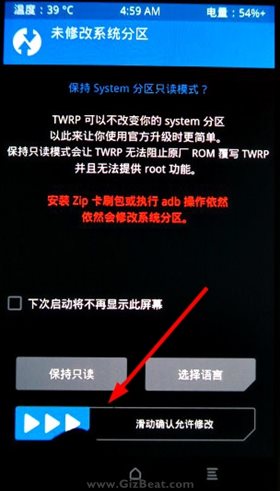
Sometimes you will get a TWRP with a Chinese menu. In that case, here’s the how to change TWRP to English from Chinese steps:
Change Xiaomi Chinese TWRP to English
- Slide the slider
- Select 2nd column, 3rd row button
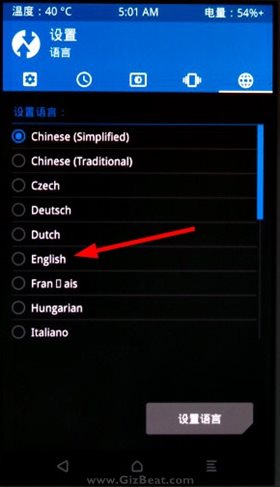
- Select the globe icon at the top
- Select English


7. Factory reset
- Within TWRP, go to Mount >> Select Storage. If you see Internal Storage as zero megabytes, it means you must Factory Reset.
- TWRP main menu >> Wipe >> Format Data >> Type “yes” >> Hit the check button on the keyboard.
- Within TWRP, go to Mount >> Select Storage. You should now see Internal Storage as the correct MB.
- TWRP will now be usable. You can Install a custom ROM, root, mount storage and backup.
8. Root your Xiaomi Redmi Pro
Now that your TWRP is functioning, you can easily root your Xiaomi Redmi Pro.
- Connect Redmi Pro to your PC.
- TWRP main menu >> Mount >> Mount USB storage. The Redmi Pro should then show up in Windows File Explorer under This PC / My Computer.
- Copy the SuperSU.zip from the zip downloaded earlier to the root of your Redmi Pro. Leave the SuperSU zipped.
- TWRP main menu >> Install
- Assuming you have the SuperSU.zip in the base of the internal storage, you should see it at /sdcard. If it’s in another directory, then navigate to whichever directory you copied the SuperSU.zip to.
- Select the SuperSU.zip
- Swipe to confirm the flash
Done! Good job. You now have TWRP and a rooted MTK6797 Helio X20 / MTK6797T Helio X25 Redmi Pro.
If you have any issues, comments, successes or failures, or just want to say thanks, please comment in the comment section and let us know.
https://gizbeat.com/11050/download-the-xiaomi-redmi-pro-twrp-and-root-pack/https://gizbeat.com/wp-content/uploads/xiaomi_redmi_pro_silver-450x336.jpghttps://gizbeat.com/wp-content/uploads/xiaomi_redmi_pro_silver-150x150.jpgGuidesHow ToRecentTutorialsXiaomiHelio X20 MTK6797 and Helio X25 MTK6797T Xiaomi Redmi Pro TWRP download and Redmi Pro root This guide will help you install TWRP and root MTK6797 and MTK6797T Redmi Pro, the first step is to install TWRP custom recovery on the MTK6797 and MTK6797T Redmi Pro. The process contains quite...Damian Parsonshttps://plus.google.com/107879368390224447304 [email protected]AdministratorHi, I'm Damian Parsons. I've been working with Android phones since the first Droid came out. I'm fascinated by computers and technology. My first BBS were ran on an old Apple IIc and Commodore 64. I work hard to bring the latest updates to you every day - without all the boring fluff. Please subscribe to keep up on the newest China tech. See our forum -> www.chinaphonearena.comGizBeat


 and new specs")


is this twrp active mtp mount and dont need me to format my data to mount cach or system files
Hello Mohammed, the two times we flashed this TWRP, format data was required. This is a good point, and we’ll get it added into the guide.
thx for fast replying mr.damian
Hello, I have a problem that occurred to me at both my redmi pro, the one was stolen so I bought a new one. Both had the same issue. When I press Install I can see other folders than the ones shown when I turn on the phone. So I cant locate the zip I have in the internal storage and flash it. All I see are folders like usbotg, twres, tmp, system, sys, supersu, sideload, sdcard, sbin, root etc. I don’t think this is random because it happened to me twice but I cant find anything on the internet. Any idea, Damian?
Before my phone was stolen, I had made it work by putting the zip file on an sd card and it was very easy to trace, but my sd was stolen with the phone, so my hands are tied now :(
Hello Panos, thanks for your comment. Sorry to hear your first Redmi Pro was stolen. That’s terrible news.
The base of internal storage is /sdcard.
Inside of /sdcard there’s only a folder named “TWRP”
Hello Panos, /sdcard is the base of your internal storage. If you don’t see the SuperSU.zip there, then that means it’s not there. Perhaps you copied it to a different folder on accident, or perhaps you’ve factory reset since copying it there? I’m just throwing out guesses.
Whatever the case, you need to copy it again. Plug the phone to PC, go to Mount in TWRP, mount USB storage, then copy SuperSU.zip again to the base of your phone, or any folder where you can find it. Into the Redmi Pro /sdcard/TWRP folder would be fine as well.
I would like to thank you for you guide. But I came across a problem. The step that I run the command “adb reboot” and hold the volume down button. I get the error “device not found”. So I manually rebooted my phone but it went into fastboot mode instead of TWRP.
Hello Mathiou, VolUp, not VolDown. Also, it should be “fastboot reboot”, not “adb reboot”. Please try again. You may need to reflash the TWRP again in the same fashion.
You are right, my bad. It worked as expected. I am into twrp but the text is in chinese. Does this has to do with my phone?
Thanks for the fast response.
Hello Mathiou, thanks for the heads up. I’ve corrected it to “fastboot reboot” in the guide. I’ve also added how to change TWRP to English from Chinese for the Redmi Pro. See the bottom portion of the guide. Regards.
hi mr damain,my redmi pro are fail to update latest miui 8.1.2.0 via OTA..now was stuck at miui 8.0.7.0,can you guide me it that stable after update to 8.1.2.0?or remain on 8.0.7?thanks for reading mr damian.please reply me asap thanks
Hi. That is a really handy guide you got there. All steps went fine for me, until I tried to mount data from TWRP to pc. I did the factory reset and the data folder size is apeared as it is (not 0mb). Let’s say that I manage to bypass this one, do I need another ROM for it to work or can I go with the official one. Do you have any good ROM in mind for RedmiPro 64gb?
Hello John, thanks for commenting. Yes, a data format is normally required (don’t format system). Then reboot and it should be fine.
There aren’t too many Redmi Pro custom ROMs. I’m using the Xiaomi.eu ROM on Redmi Pro. It’s quite good.
Regards
Thank bro.. it work!
Isn’t this guide working for redmi pro 4gb ram 128gb rom also?
Yes, no problem.
thanks you so much , i like this :)
after I flash TWRP successfully via fastboot i can’t reboot into recovery… i tried with the recovery reboot command + also turned on phone in normal mode, went to update settings and selected “Reboot to recovery” but both methods don’t load TWRP
hi goodmorning sir. i opened he usb debugging mode already but it says device not found
Hi, Try “adb kill-server”, then “adb start-server”. Then “adb devices” again.
If that doesn’t work, check Device Manager and see if yellow exclamation next to your device.
great guide, thank you for your time
Thank U Damian . This was worked but R.I.P my Data. :-(
hi ,failed (remote: download for partition “recovery” is not allowed) any help
tanks for this, but…. if one is using mac how to operate ?
after choose mount,mount usb storage, my device didn’t show up in windows explorer (my computer)
please help
Hi! Thanks for a guide, but it didn’t work)
I stuck on “adb reboot bootloader”, though I did all what u wrote before
Command line answers “abd server out of date. killing”
then “device unauthorized” or, if I entered Fastboot – “abd server didnt ACK”
heeelp