[Newbie Guide] Flash your Xiaomi Redmi 4 Prime using MiFlash and HS-USB QDloader 9008
Xiaomi Redmi 4 Prime, Redmi 4 Pro unbrick and Xiaomi Redmi 4 Prime flash guide
Flashing your Xiaomi Redmi 4 Prime using the Qualcomm HS-USB QDloader 9008 port is not a difficult process, but it can seem a daunting process for those who haven’t flashed their Qualcomm mobile before.
NOTE: This guide is in progress. The written portion is mostly complete. Images will be coming soon.
Some users use the official Qualcomm Qfil QPST flasher, but in this guide we will use Xiaomi MiFlash, which does the same job, but saves a few steps, as all you need to do with MiFlash is to point it to the extracted ROM.
This guide will work for all Qualcomm phones, but you must have the appropriate ROM for your phone. In this guide, we will be linking to the ROM for Redmi 4 Prime, also known as Xiaomi Redmi 4 Pro.
Whether you’re here for unbricking your Redmi 4 Prime / Redmi 4 Pro, or you want to come off of the Xiaomi Redmi 4 Prime shop ROM, this is the guide you need.
NOTE: This flashing method may erase all data on your phone. Backup any important pictures, documents, and files to your PC, the cloud, or another phone before flashing. We take no responsibility for any problems that may occur. You attempt to flash your phone at your own risk.
.mbn vs .elf
In the past, Qualcomm ROMs came with a “prog_emmc_firehose_8994_ddr.mbn” or “prog_emmc_firehose_8994_lite.mbn”. The important thing being the “.mbn” extension, which may confuse people a bit, as the newer Snapdragon 820 ROMs often have “prog_emmc_firehose_8996_ddr.elf”, or “prog_emmc_firehose_8996_lite.elf”.
This could throw you off if you’re using the official Qualcomm flash utility, as it won’t see the “.elf” file because it’s looking specifically for “.mbn”. This is one of the reasons we are using the Xiaomi MiFlash, as it automatically finds and configures the flash for you.
1. HS-USB QDloader 9008 driver download and Xiaomi Redmi 4 Prime ROM download
- Redmi 4 Prime / Redmi 4 Pro flash tool and drivers — The first thing we need to flash or unbrick our Xiaomi Redmi 4 Prime with the stock factory ROM are the appropriate drivers. These drivers will auto-install. You simply extract, double-click and follow the prompts. In this pack, you will also see Zuk Z2 drivers. Thise Zuk Z2 drivers can be ignored. Just install the MiFlash and the adb auto installer.
- Redmi 4 Prime ROM / Xiaomi Redmi 4 Prime ROM / Xiaomi Redmi 4 Prime 2131 ROM — This is where to download the latest fastboot ROM for Redmi 4 Pro / Redmi 4 Prime. This ROM is OTA updateable. It means that after flashing, you can OTA update Xiaomi Redmi 4 Prime in the future without having to go through this PC flashing process again..
2. Setting your PC to test mode
Generally on 64bit Windows, installing drivers may require your PC to be in test mode. If you attempt to install a driver, and see any notifications from your PC indicating the drivers can’t be installed, you need to boot your PC in test mode.
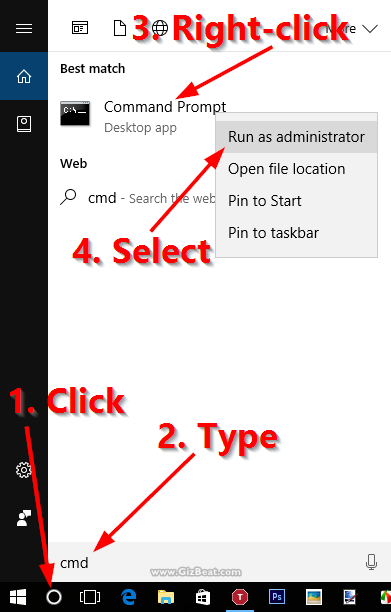
- Logon to Windows with an admin / administrator account
- Open the Windows Start menu and type “cmd”
- RIGHT-CLICK on ‘Command Prompt’
- Select ‘Run as administrator’
- In the black window that opens, type “bcdedit.exe -set TESTSIGNING ON”
- Reboot your PC
3. Install the drivers and tools
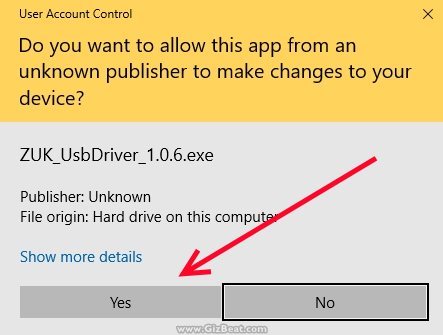
Note, during the install of these drivers, you may see User Account Control (UAC) permission requests or notifications alerting you that the drivers are unsigned. Make sure to allow all of these permission requests, or the drivers will not properly install.
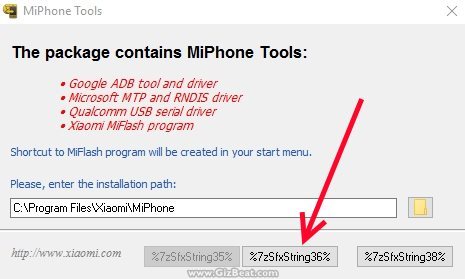
- QDloader 9008 MiFlash tool and Qualcomm drivers — This is the tool and the required drivers for the Qualcomm MiFlash utility to communicate with the mobile via USB for flashing. DOUBLE-CLICK the extracted MiFlash from the above download and follow the prompts.
- Xiaomi Redmi 4 Prime drivers — These are the official Xiaomi Redmi 4 Prime drivers. They may not be needed. However, it can’t hurt to have them installed. DOUBLE-CLICK the extracted Xiaomi Redmi 4 Prime drivers and follow the prompts.
- adb, and fastboot command sets — These are the tools and drivers which will allow you to reboot your Xiaomi Redmi 4 Prime to a mode that will allow flashing from the PC. DOUBLE-CLICK the extracted adb driver auto-installer and type “Y” at all three prompts.

3. Turn on Xiaomi Redmi 4 Prime USB debugging
This process is what will allow your PC to communicate with your phone so that you can give it the command to boot into a mode that will allow it to be flashed.
- Go to Settings >> About phone >> Tap “Build Number” or “Zuk Version” 7x or until it tells you you’re a developer
- Hit the back button
- Go to ‘Advanced’
- Scroll to and tap ‘Developer Options’
- Toggle on ‘USB debugging’
- Toggle on ‘USB 2.0’ if you see the option there
4. Boot your Qualcomm mobile to edl mode
In this step, we put the phone in a mode where it can communicate with MiFlash and properly flash the ROM.
In step 4.3 we installed the adb and fastboot command sets. When we did this, a folder called ‘adb’ was created in your system drive. Typically this is the ‘c:’ drive.
- Go to ‘c:/adb’
- In a blank spot in the folder (not on a file line), RIGHT-CLICK and select ‘Open command window here’
- Connect your Powered-On mobile via USB to your PC
- Pay very close attention to your Xiaomi Redmi 4 Prime and when you see a Debugging Permission Requests come up, select ‘Do not ask me again’, and make sure to allow
- If you see any driver installs begin, let them complete
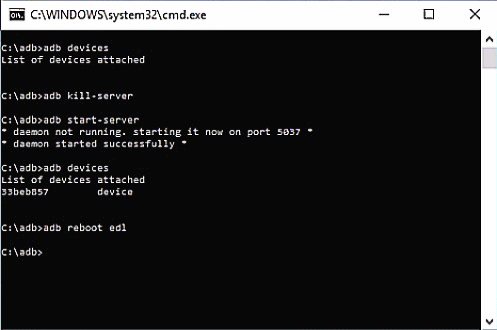
- In the black command window that popped up from step 4.2, type “adb devices”. You should at this point see a device serial #, and ‘device’ in the right column.
- If it shows nothing, type ‘adb kill-server’, then ‘adb start-server’. Continue to pay close attention to your phone and allow any Debugging Permission Requests. Type ‘adb devices’ again.
- Type ‘adb reboot edl’. Your phone display should go blank and stay blank. Don’t be alarmed, you are now in ‘edl’ aka ‘Emergency DownLoad mode’.
Flash Xiaomi Redmi 4 Prime ROM using MiFlash QDloader 9008 PC flash tool
In the previous step, we installed the MiFlash Tool. Start it up by going to Windows Start menu search and typing “MiFlash”, then select it and wait for it to open. You should see a window that looks similar to one of the two below, depending on which version of MiFlash you are using.
If you can’t locate MiFlash from the Windows Start menu or from the shortcut on the desktop, navigate to ‘C:\Program Files\Xiaomi\MiPhone’ or at ‘C:\XiaoMi\XiaoMiFlash’, and DOUBLE-CLICK ‘MiFlash’ or ‘XiaoMiFlash’.
- In the MiFlash window, click ‘Browse’ and direct MiFlash to your already extracted Xiaomi Redmi 4 Prime ROM from step 1.2 / 1.3
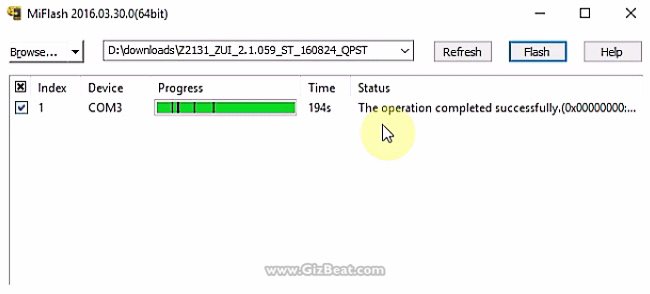
- In the MiFlash window, click ‘Refresh’, or hit F5. After a couple of seconds you should see a blank progress bar and ‘COM#’, which designates the COM port your Xiaomi Redmi 4 Prime has been connected to.
- In the bottom of MiFlash you will see several options. Normally we select ‘Flash all except storage’, but you are free to use any of them. Note, that just because you select ‘Flash all except storage’ or ‘Flash all except storage and data’, does not mean this data will be saved. It will depend on the script prepared by the ROM engineers for this particular ROM.
- Now is the moment of truth, go ahead and click ‘Flash’ and the flash should begin. Typically a flash will take about 3-4 minutes.
Start your phone
- After the flash is complete, disconnect the Xiaomi Redmi 4 Prime from your PC
- Hold the Power Button for about 5-9 seconds and your Xiaomi Redmi 4 Prime should then start.
We strive to provide accurate and helpful guides and reviews. In the comments below, let us know your successes, failures, and any information you would like to add to help make this guide more useful for future users.
https://gizbeat.com/11462/newbie-guide-flash-your-xiaomi-redmi-4-prime-using-miflash-and-hs-usb-qdloader-9008/https://gizbeat.com/wp-content/uploads/redmi-4-pro-450x258.jpghttps://gizbeat.com/wp-content/uploads/redmi-4-pro-150x150.jpgGuidesQualcommXiaomiXiaomi Redmi 4 Prime, Redmi 4 Pro unbrick and Xiaomi Redmi 4 Prime flash guide Flashing your Xiaomi Redmi 4 Prime using the Qualcomm HS-USB QDloader 9008 port is not a difficult process, but it can seem a daunting process for those who haven't flashed their Qualcomm mobile before. NOTE: This...Damian Parsonshttps://plus.google.com/107879368390224447304 [email protected]AdministratorHi, I'm Damian Parsons. I've been working with Android phones since the first Droid came out. I'm fascinated by computers and technology. My first BBS were ran on an old Apple IIc and Commodore 64. I work hard to bring the latest updates to you every day - without all the boring fluff. Please subscribe to keep up on the newest China tech. See our forum -> www.chinaphonearena.comGizBeat


Leave a Reply